Integrating ERPNext with Wazuh SIEM: Building a Security Pipeline
Trading "I Think We're Safe" for "I Know We're Safe" on ERPNext Using Wazuh and Webhooks

The Problem
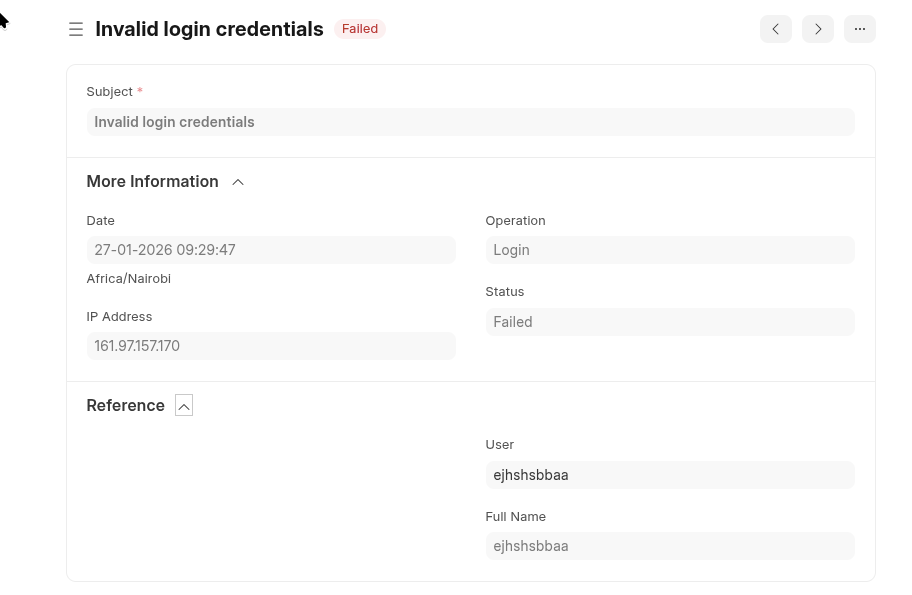
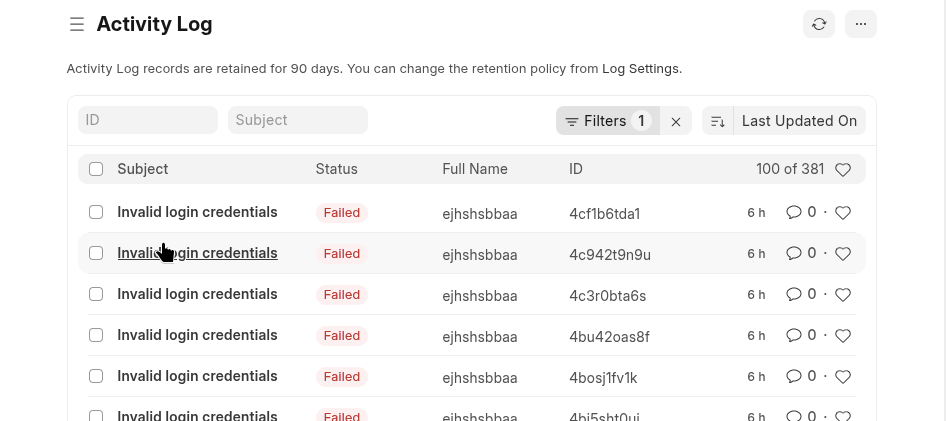
ERPNext is used widely to manage business operations, everything from accounting to inventory and HR. Like most web applications, it keeps logs. It stores user authentication activity in its Activity Logs.
The problem is that for the most part this log... just sits there. It is stored in the database until someone manually queries it. In this form, it is completely useless to an IT admin, security professional, or system owner. If an attacker is trying to guess passwords right now, you wouldn't know unless you happened to be looking at the logs at that exact moment. That is not security monitoring. That is hope.
The problem is that this log just sits there. It is stored in the database until someone manually queries it. To fix this blind spot, I wanted a system that watches the logs continuously and alerts me when something suspicious happens. Five failed login attempts in two minutes? Alert. Ten password guesses from the same IP address? Alert.
This is exactly what a SIEM (Security Information and Event Management) system like Wazuh does. It collects logs, analyzes them in real-time, and flags threats and can perform active response as needed. I already had Wazuh running as my SIEM for server logs. The new mission was to feed ERPNext's authentication logs directly into Wazuh.
Why the Webhook Approach
There are a few ways to get ERPNext logs into Wazuh:
- Direct database queries - Have Wazuh query ERPNext's database periodically
- File-based logging - Write ERPNext logs to a file and have Wazuh monitor it
- Webhook-based - Have ERPNext send events to a receiver in real-time
The ERPNext deployment in question is a managed instance, effectively ruling out direct database access and eliminating the first option entirely. The second option of file-based logging would have introduced an unnecessary layer of complexity and abstraction to maintain and monitor. This left us with the third option as the most suitable choice because webhooks operate over standard HTTP requests, allowing us to seamlessly push real-time events out of the managed environment without ever needing underlying system access.I went with option 3, the webhook approach.
This method also provides the distinct advantage of immediate updates while ensuring the external system only receives the exact data it needs, perfectly following the principle of least privilege. It also creates a much cleaner separation between the platforms. The webhook approach keeps ERPNext and Wazuh loosely coupled because ERPNext does not need to know anything about the security system itself. It just sends webhooks to a destination URL. If I ever decide to swap out Wazuh for a different tool, my ERPNext configuration does not have to change at all.
The tradeoff I made for this flexibility was a slight bump in complexity. In order to receive the webhook data and translate it into a format Wazuh understands, I needed to run a receiver application to catch those incoming webhooks. Fortunately, this translator is just a small Python Flask app that takes about thirty lines of code to write.
The Architecture
Here's how data flows through the system:
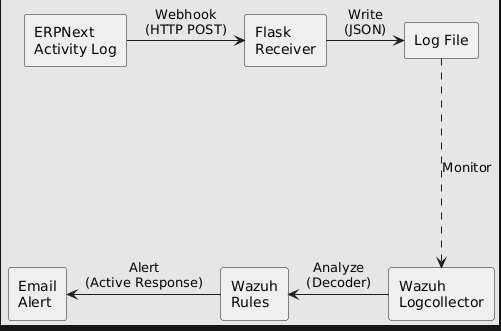
Let me break down each component:
- ERPNext Activity Log - The source. Every action in ERPNext generates a log entry. We configure a webhook to fire whenever a new entry is created.
- Flask Receiver - A small Python web application. It listens for incoming webhooks and writes them to a file. Think of it as a translator between ERPNext's webhook format and something Wazuh can read.
- Log File - A simple text file where each line is one event in JSON format. Wazuh knows how to read this.
- Wazuh Logcollector - A Wazuh component that monitors files for new lines. When a new line appears, it sends it to the analysis engine.
- Wazuh Rules - The detection logic. Rules define patterns like "if there are 5 failed logins from the same user within 2 minutes, that's a brute force attack."
- Active Response - Automated actions that trigger when rules match. In our case, sending an email alert.
Part 1: The Webhook Receiver
The receiver is the bridge between ERPNext and Wazuh. It needs to:
- Listen for HTTP POST requests from ERPNext
- Extract the JSON data from each request
- Append that data to a log file
Here's the complete script:
#!/usr/bin/env python3
"""
  ERPNext to Wazuh Webhook Receiver

  This script receives activity log webhooks from ERPNext
  and writes them to a log file that Wazuh monitors.
"""

from flask import Flask, request, jsonify
import json
import os
from datetime import datetime

app = Flask(__name__)

# Where to write the logs
# This path is inside Wazuh's directory so it has proper permissions
LOG_DIR = '/var/ossec/logs/erpnext'
ACTIVITY_LOG = os.path.join(LOG_DIR, 'activity.log')

# Create the directory if it doesn't exist
os.makedirs(LOG_DIR, exist_ok=True)

@app.route('/webhook/erpnext/activity', methods=['POST'])
def activity_webhook():
    """
    Receives POST requests from ERPNext webhooks.
    Each request contains JSON data about an activity log event.
    """
    try:
        # Get the JSON data from the request
        data = request.get_json()

        # Append it to our log file (one JSON object per line)
        with open(ACTIVITY_LOG, 'a') as f:
            f.write(json.dumps(data) + '\n')

        return jsonify({'status': 'success'}), 200

    except Exception as e:
        # If something goes wrong, return an error
        # ERPNext will see this and can retry if configured to
        return jsonify({'status': 'error', 'message': str(e)}), 500

@app.route('/health', methods=['GET'])
def health():
    """
    Health check endpoint.
    Useful for monitoring if the receiver is running.
    """
    return jsonify({'status': 'healthy', 'timestamp': datetime.now().isoformat()}), 200

if __name__ == '__main__':
    # Listen on all interfaces (0.0.0.0) so ERPNext can reach us
    # Port 5000 is Flask's default
    app.run(host='0.0.0.0', port=5000)
A few things to note:
- Why Flask? Flask is a lightweight Python web framework. It's simple to set up and doesn't require much code to create an HTTP endpoint. For a simple webhook receiver, it's perfect.
- Why
/var/ossec/logs/? This is Wazuh's log directory. Writing here ensures Wazuh has permission to read the file. It also keeps all logs in one place. - One JSON per line. Each line in the log file is a complete JSON object. This format is called JSONL (JSON Lines) and Wazuh handles it natively.
Running as a Service
The receiver needs to run continuously, not just when we start it manually. For this, I created a systemd service file so Linux starts it automatically on boot and persists across server sessions.
# /etc/systemd/system/erpnext-webhook.service

[Unit]
Description=ERPNext Webhook Receiver for Wazuh
After=network.target

[Service]
Type=simple
User=wazuh
Group=wazuh
ExecStart=/usr/bin/python3 /var/ossec/integrations/custom-erpnext
Restart=on-failure
RestartSec=5

[Install]
WantedBy=multi-user.target
Enable and start the service:
sudo systemctl daemon-reload
sudo systemctl enable erpnext-webhook
sudo systemctl start erpnext-webhook
Verify it's running:
sudo systemctl status erpnext-webhook
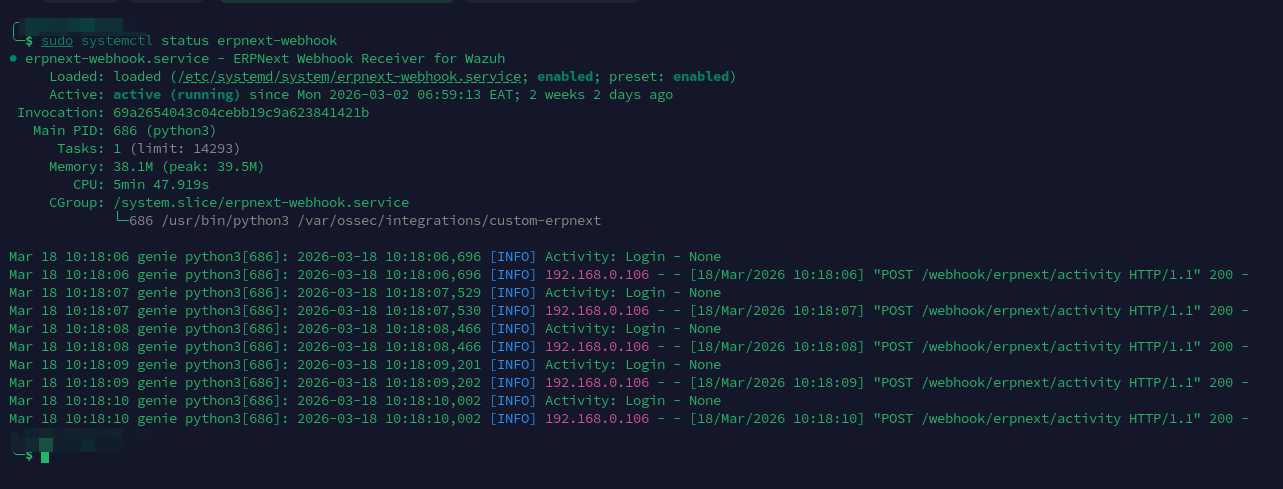
You can also test the health endpoint with:
curl http://localhost:5000/health
Should return: {"status": "ok"} as shown below

Part 2: ERPNext Webhook Configuration
Now we need to tell ERPNext to send webhooks to our receiver.
In ERPNext, navigate to Settings → Webhook and create a new webhook with these settings:
| Setting | Value |
|---|---|
| DocType | Activity Log |
| Document Event | on_update |
| Request URL | http://YOUR_SERVER_IP:5000/webhook/erpnext/activity |
| Request Method | POST |
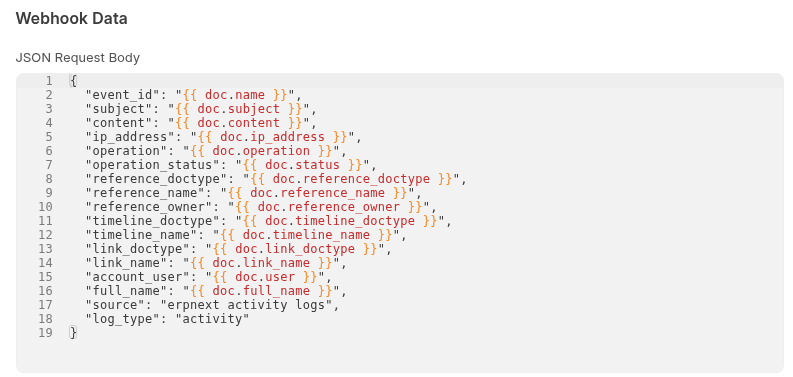
Webhook Data Structure
Under "Webhook Data", we define what fields to send. This is important—we need to include enough information for Wazuh to make security decisions.
Here's the structure I use:
{
  "event_id": "{{ doc.name }}",
  "account_user": "{{ doc.user }}",
  "full_name": "{{ doc.full_name }}",
  "ip_address": "{{ doc.ip_address }}",
  "operation": "{{ doc.operation }}",
  "operation_status": "{{ doc.status }}",
  "subject": "{{ doc.subject }}",
  "reference_doctype": "{{ doc.reference_doctype }}",
  "reference_name": "{{ doc.reference_name }}",
  "reference_owner": "{{ doc.reference_owner }}",
  "log_type": "activity",
  "source": "erpnext activity logs"
}
Important: Field Name Changes
Notice I'm mapping doc.user to account_user and doc.status to operation_status. This isn't arbitrary, Wazuh reserves certain field names.
When I first set this up, I used user and status directly. Wazuh refused to start, giving me this error:
CRITICAL: Error loading the rules - Field 'status' is static
Wazuh uses status and user internally, so we can't use those names in our JSON. Renaming them to account_user and operation_status fixes the issue.
What Each Field Means
| Field | Purpose |
|---|---|
event_id |
Unique identifier for this event |
account_user |
The email/username of who performed the action |
full_name |
Human-readable name |
ip_address |
Where the request came from—crucial for detecting attacks |
operation |
What happened: Login, Logout, Create, Delete, etc. |
operation_status |
Success or Failed |
subject |
Description of the event |
reference_doctype |
What type of document was affected |
reference_name |
Which specific document |
log_type |
Always "activity"—helps Wazuh identify these logs |
Part 3: Wazuh Configuration
With the receiver running and ERPNext sending webhooks, we now configure Wazuh to monitor and analyze the logs.
Tell Wazuh to Monitor the Log File
Edit Wazuh's main configuration file:
sudo nano /var/ossec/etc/ossec.conf
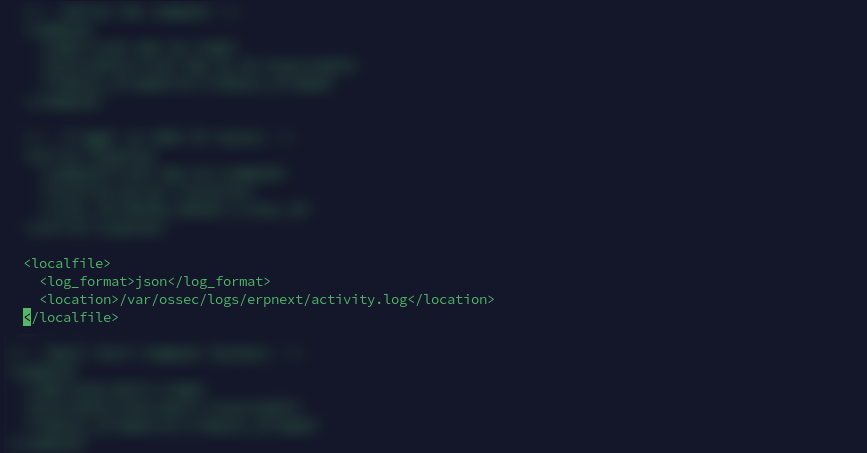
Add this block inside the <ossec_config> section:
<localfile>
  <log_format>json</log_format>
  <location>/var/ossec/logs/erpnext/activity.log</location>
</localfile>
The log_format is important. Setting it to json tells Wazuh that each line is a JSON object. Wazuh will automatically parse the JSON and extract fields like account_user, ip_address, etc. If we used syslog format, Wazuh would treat each line as plain text and our rules wouldn't work.
Understanding Wazuh Rules
Before we write rules, let's understand how Wazuh's rule system works.
Wazuh rules are hierarchical. A rule can match based on:
- The decoder that parsed the log (e.g., "json")
- Specific field values (e.g.,
operationequals "Login") - Another rule having already matched (using
if_sidorif_matched_sid)
Rules have levels from 0 to 15:
- Level 0: No alert generated (used for parent rules)
- Levels 1-5: Low priority
- Levels 6-10: Medium priority
- Levels 11-15: High priority
Rules can also have a frequency attribute. This says "only alert if this pattern occurs X times within Y seconds." This is how we detect brute force attacks.
The Detection Rules
Create a new rules file:
sudo nano /var/ossec/etc/rules/erpnext_rules.xml
Here's the complete ruleset with explanations:
<group name="erpnext,">

  <!--
    BASE RULE
    This matches any log from ERPNext. It's level 0, meaning it won't
    generate an alert by itself. It exists so other rules can build on it.
  -->
  <rule id="100100" level="0">
    <decoded_as>json</decoded_as>
    <field name="log_type">^activity$</field>
    <description>ERPNext: Activity log event</description>
  </rule>

  <!--
    AUTHENTICATION RULES
    These detect login-related events.
  -->

  <!-- Successful login - level 3 (informational) -->
  <rule id="100101" level="3">
    <if_sid>100100</if_sid>
    <field name="operation">^Login$</field>
    <field name="operation_status">^Success$</field>
    <description>ERPNext: Login success - $(account_user) from $(ip_address)</description>
    <group>authentication_success,</group>
  </rule>

  <!-- Failed login - level 5 (notable) -->
  <rule id="100102" level="5">
    <if_sid>100100</if_sid>
    <field name="operation">^Login$</field>
    <field name="operation_status">^Failed$</field>
    <description>ERPNext: Login failed - $(account_user) from $(ip_address)</description>
    <mitre><id>T1110</id></mitre>
    <group>authentication_failed,</group>
  </rule>

  <!-- Logout - level 3 (informational) -->
  <rule id="100103" level="3">
    <if_sid>100100</if_sid>
    <field name="operation">^Logout$</field>
    <description>ERPNext: Logout - $(account_user)</description>
    <group>authentication_success,</group>
  </rule>

  <!--
    BRUTE FORCE DETECTION
    These rules trigger when failed logins happen repeatedly.
  -->

  <!--
    Brute force by user: 5 failed logins for the same account in 2 minutes

    - frequency="5" means this needs 5 matching events
    - timeframe="120" means within 120 seconds (2 minutes)
    - same_field="account_user" means all 5 must be for the same user
    - ignore="60" prevents duplicate alerts for 60 seconds
  -->
  <rule id="100104" level="10" frequency="5" timeframe="120" ignore="60">
    <if_matched_sid>100102</if_matched_sid>
    <same_field>account_user</same_field>
    <description>ERPNext: Brute force attack on user $(account_user)</description>
    <group>authentication_failed,attack,</group>
  </rule>

  <!--
    Brute force by IP: 10 failed logins from the same IP in 2 minutes

    This catches attackers trying different usernames from one location.
    Higher threshold (10) because multiple users might legitimately
    fail from the same office IP.
  -->
  <rule id="100105" level="12" frequency="10" timeframe="120" ignore="60">
    <if_matched_sid>100102</if_matched_sid>
    <same_field>ip_address</same_field>
    <description>ERPNext: Brute force attack from IP $(ip_address)</description>
    <group>authentication_failed,attack,</group>
  </rule>

  <!--
    USER MANAGEMENT RULES
    Detect when user accounts are created or deleted.
  -->

  <rule id="100110" level="5">
    <if_sid>100100</if_sid>
    <field name="reference_doctype">^User$</field>
    <field name="operation">^Create$</field>
    <description>ERPNext: User created - $(reference_name) by $(account_user)</description>
    <group>account_change,</group>
  </rule>

  <rule id="100111" level="7">
    <if_sid>100100</if_sid>
    <field name="reference_doctype">^User$</field>
    <field name="operation">^Delete$</field>
    <description>ERPNext: User deleted - $(reference_name) by $(account_user)</description>
    <group>account_change,</group>
  </rule>

  <!--
    PERMISSION CHANGES
    Higher severity because permission changes can be used to escalate access.
  -->
  <rule id="100115" level="8">
    <if_sid>100100</if_sid>
    <field name="reference_doctype">Role|Has Role|User Permission</field>
    <description>ERPNext: Permission changed - $(reference_doctype) by $(account_user)</description>
    <group>config_change,</group>
  </rule>

  <!--
    DOCUMENT OPERATIONS
    Track create, delete, submit, cancel operations on documents.
  -->

  <rule id="100120" level="3">
    <if_sid>100100</if_sid>
    <field name="operation">^Create$</field>
    <description>ERPNext: Created - $(reference_doctype): $(reference_name)</description>
    <group>document,</group>
  </rule>

  <rule id="100122" level="5">
    <if_sid>100100</if_sid>
    <field name="operation">^Delete$</field>
    <description>ERPNext: Deleted - $(reference_doctype): $(reference_name)</description>
    <group>document,</group>
  </rule>

  <rule id="100124" level="6">
    <if_sid>100100</if_sid>
    <field name="operation">^Cancel$</field>
    <description>ERPNext: Cancelled - $(reference_doctype): $(reference_name)</description>
    <group>document,</group>
  </rule>

  <!--
    MASS DELETION DETECTION
    10 deletions by the same user in 5 minutes could indicate
    malicious activity or a compromised account.
  -->
  <rule id="100125" level="10" frequency="10" timeframe="300">
    <if_matched_sid>100122</if_matched_sid>
    <same_field>account_user</same_field>
    <description>ERPNext: Mass deletion detected by $(account_user)</description>
    <group>document,attack,</group>
  </rule>

  <!--
    FINANCIAL DOCUMENT MONITORING
    Extra scrutiny for invoices, payments, journal entries.
  -->
  <rule id="100130" level="4">
    <if_sid>100100</if_sid>
    <field name="reference_doctype">Sales Invoice|Purchase Invoice|Payment Entry|Journal Entry</field>
    <description>ERPNext: Financial activity - $(reference_doctype): $(reference_name)</description>
    <group>financial,</group>
  </rule>

  <rule id="100131" level="7">
    <if_sid>100130</if_sid>
    <field name="operation">^Cancel$</field>
    <description>ERPNext: Financial document cancelled - $(reference_doctype) by $(account_user)</description>
    <group>financial,</group>
  </rule>

</group>
Why These Specific Thresholds?
- 5 failed logins per user: A legitimate user might mistype their password once or twice. Five times in two minutes suggests someone guessing.
- 10 failed logins per IP: Set higher because an office might have many users behind one IP. Ten failures from different accounts is suspicious.
- 10 deletions in 5 minutes: Normal users rarely delete ten documents in five minutes. This catches both malicious actors and compromised accounts.
- Ignore period of 60 seconds: Once we alert on a brute force, we don't need another alert every second. One alert per minute is enough to investigate.

Testing the Rules
Before generating real events, you can test rules using Wazuh's logtest tool:
sudo /var/ossec/bin/wazuh-logtest
Paste a sample log line:
{"event_id":"test1","subject":"Invalid login credentials","ip_address":"196.216.93.41","operation":"Login","operation_status":"Failed","account_user":"attacker@example.com","log_type":"activity"}
You should see output showing which rule matched:
**Phase 3: Completed filtering (rules).
        id: '100102'
        level: '5'
        description: 'ERPNext: Login failed - attacker@example.com from 196.216.93.41'
To test the brute force rule, paste the same line 5+ times. On the 5th paste, you should see rule 100104 fire.
[GIF: Terminal showing wazuh-logtest with multiple pastes, culminating in the brute force rule firing]
Restart Wazuh
After adding rules, restart Wazuh to load them:
sudo systemctl restart wazuh-manager
Check the logs for any errors:
sudo cat /var/ossec/logs/ossec.log | grep -i error | tail -20
Part 4: Email Alerts with Active Response
Wazuh can do more than just log alerts—it can take action. This is called Active Response. We'll use it to send an email whenever a brute force attack is detected.
The Email Script
Create the script at /var/ossec/active-response/bin/send-email.py:
#!/usr/bin/env python3
"""
Wazuh Active Response Script - Email Alert

This script is called by Wazuh when specific rules trigger.
It receives alert data via stdin and sends an email notification.
"""

import sys
import json
import smtplib
import ssl
from email.message import EmailMessage
from datetime import datetime

# ============================================
# CONFIGURATION - Update these values
# ============================================
SMTP_SERVER = "smtp.gmail.com"
SMTP_PORT = 587
SMTP_USER = "your-email@gmail.com"
SMTP_PASSWORD = "your-app-password"  # Use app password, not regular password
EMAIL_TO = "alerts@yourdomain.com"
EMAIL_FROM = "your-email@gmail.com"
# ============================================

LOG_FILE = '/var/ossec/logs/active-responses.log'

def log(message):
    """Write to the active response log for debugging."""
    with open(LOG_FILE, 'a') as f:
        f.write(f"{datetime.now()} - {message}\n")

def send_email(subject, body):
    """Send an email using SMTP with TLS encryption."""
    try:
        msg = EmailMessage()
        msg['From'] = EMAIL_FROM
        msg['To'] = EMAIL_TO
        msg['Subject'] = subject
        msg.set_content(body)

        # Create secure connection
        context = ssl.create_default_context()

        with smtplib.SMTP(SMTP_SERVER, SMTP_PORT) as server:
            server.starttls(context=context)
            server.login(SMTP_USER, SMTP_PASSWORD)
            server.send_message(msg)

        return True
    except Exception as e:
        log(f"Email error: {e}")
        return False

def main():
    # Wazuh sends alert data via stdin as JSON
    try:
        input_data = sys.stdin.read()
        if not input_data:
            log("No input received")
            sys.exit(1)

        alert = json.loads(input_data)
    except Exception as e:
        log(f"Failed to parse input: {e}")
        sys.exit(1)

    # Extract relevant fields from the alert
    try:
        params = alert.get('parameters', {})
        alert_data = params.get('alert', {})

        rule_id = alert_data.get('rule', {}).get('id', 'N/A')
        rule_desc = alert_data.get('rule', {}).get('description', 'N/A')
        rule_level = alert_data.get('rule', {}).get('level', 'N/A')
        timestamp = alert_data.get('timestamp', 'N/A')
        agent_name = alert_data.get('agent', {}).get('name', 'N/A')

        # ERPNext-specific fields
        data = alert_data.get('data', {})
        src_ip = data.get('ip_address', 'N/A')
        account_user = data.get('account_user', 'N/A')
        operation = data.get('operation', 'N/A')
    except Exception as e:
        log(f"Failed to extract fields: {e}")
        sys.exit(1)

    # Build the email
    subject = f"[WAZUH ALERT] Rule {rule_id} - {rule_desc}"

    body = f"""
Security Alert from Wazuh
=========================

Rule ID:       {rule_id}
Severity:      {rule_level}
Description:   {rule_desc}

Time:          {timestamp}
Server:        {agent_name}

Details:
--------
User:          {account_user}
Source IP:     {src_ip}
Operation:     {operation}

This is an automated alert. Please investigate if unexpected.
    """

    # Send it
    if send_email(subject, body):
        log(f"Email sent for rule {rule_id} - User: {account_user}, IP: {src_ip}")
    else:
        log(f"Failed to send email for rule {rule_id}")

if __name__ == "__main__":
    main()
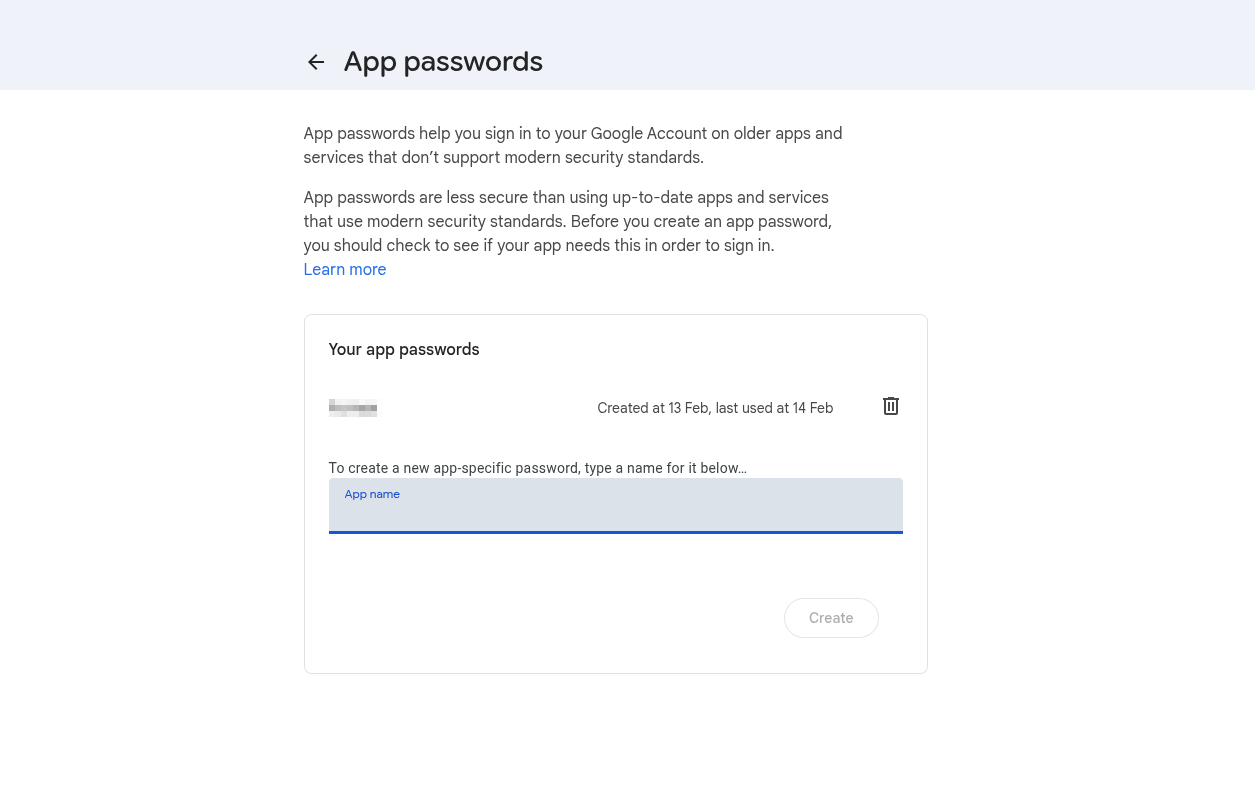
Gmail App Passwords
If you're using Gmail, you can't use your regular password. Google requires an "App Password" for third-party applications.
To create one:
- Go to your Google Account settings
- Navigate to Security → 2-Step Verification (enable if not already)
- At the bottom, find "App passwords"
- Generate a new app password for "Mail"
- Use this 16-character password in the script
Set Permissions
The script needs to be executable and owned by Wazuh:
sudo chmod 750 /var/ossec/active-response/bin/send-email.py
sudo chown root:wazuh /var/ossec/active-response/bin/send-email.py
Configure Active Response
Add the following to /var/ossec/etc/ossec.conf:
<!-- Define the command -->
<command>
  <name>send-email</name>
  <executable>send-email.py</executable>
  <timeout_allowed>no</timeout_allowed>
</command>

<!-- Trigger it for brute force rules -->
<active-response>
  <command>send-email</command>
  <location>server</location>
  <rules_id>100104,100105</rules_id>
</active-response>
This tells Wazuh: "When rule 100104 or 100105 fires, run the send-email.py script on the server."
Test the Email Script
Before relying on Wazuh to trigger it, test the script manually:
echo '{"parameters":{"alert":{"rule":{"id":"100104","description":"Brute force test","level":10},"timestamp":"2026-01-27T10:00:00","agent":{"name":"test-server"},"data":{"ip_address":"1.2.3.4","account_user":"test@example.com","operation":"Login"}}}}' | sudo /var/ossec/active-response/bin/send-email.py
Check if you received the email. If not, check the log:
sudo tail /var/ossec/logs/active-responses.log
What Went Wrong Along the Way
No integration goes smoothly the first time. Here's what broke and how I fixed it.
Reserved Field Names
My first attempt used user and status as field names in the webhook. Wazuh refused to start:
CRITICAL: Error loading the rules - Field 'status' is static
Wazuh uses these names internally, so we can't use them in our data. The fix was renaming them to account_user and operation_status in the ERPNext webhook configuration.
Dynamic vs Static Fields
The same_field directive in brute force rules only works with "dynamic" fields—fields that come directly from the JSON decoder.
Wazuh automatically converts user to dstuser (a "static" field). I had a rule with <same_field>dstuser</same_field> and it never triggered. Changing the field name to account_user kept it as a dynamic field, and the rule started working.
This one took a while to figure out. The rule was syntactically correct, Wazuh loaded it without errors, but it just never fired. The wazuh-logtest tool was essential for debugging—it showed me exactly which fields were available after decoding.
Active Response Queue Getting Stuck
My email script worked when tested manually, but wouldn't fire when rules triggered. Alerts appeared in the dashboard, but no emails were sent. However, if I restarted the Wazuh manager, emails for old alerts would suddenly send.
The execd queue (the component that handles active responses) was stuck. The fix:
sudo systemctl stop wazuh-manager
sudo rm -f /var/ossec/queue/sockets/*
sudo rm -f /var/ossec/queue/alerts/execq
sudo systemctl start wazuh-manager
This clears the queues and forces Wazuh to recreate them. It's a known issue that's been reported on Wazuh's GitHub.
Testing the Full Pipeline
With everything configured, let's test the complete flow.
Generate Failed Logins
In ERPNext, try logging in with an incorrect password 5 times within 2 minutes. You can use a private/incognito window to avoid being locked out of your real session.
Watch the Alerts
In one terminal, watch for alerts:
sudo tail -f /var/ossec/logs/alerts/alerts.json | grep "100104"
In another terminal, watch for active response:
sudo tail -f /var/ossec/logs/active-responses.log
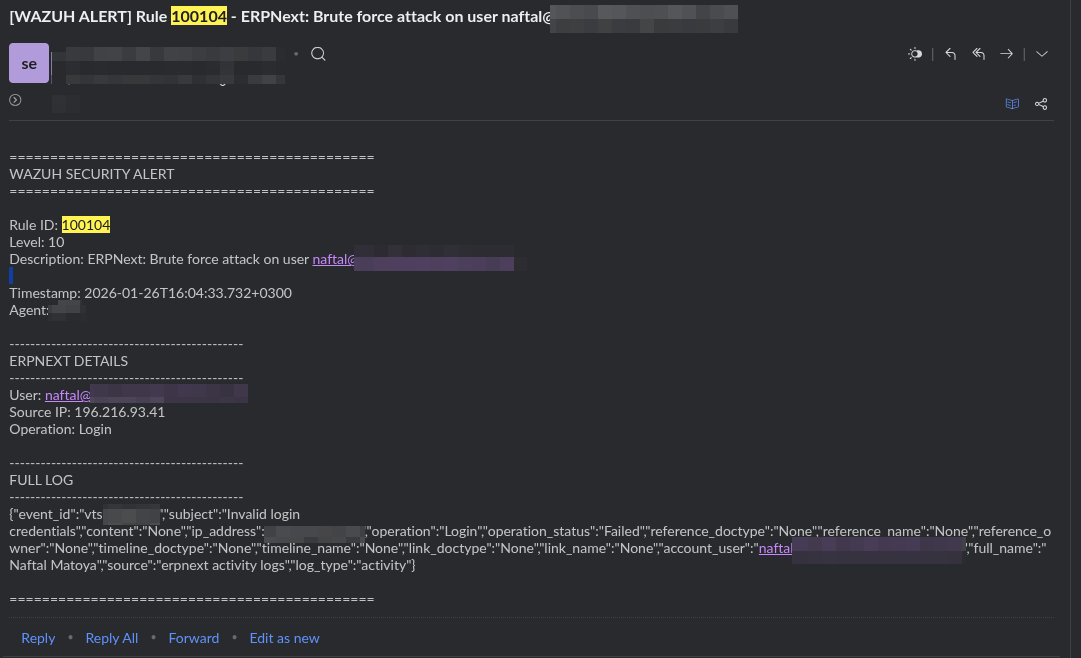
After the 5th failed login, you should see:
- Rule 100104 appear in the alerts log
- An entry in the active-responses log showing the email was sent
- An email in your inbox
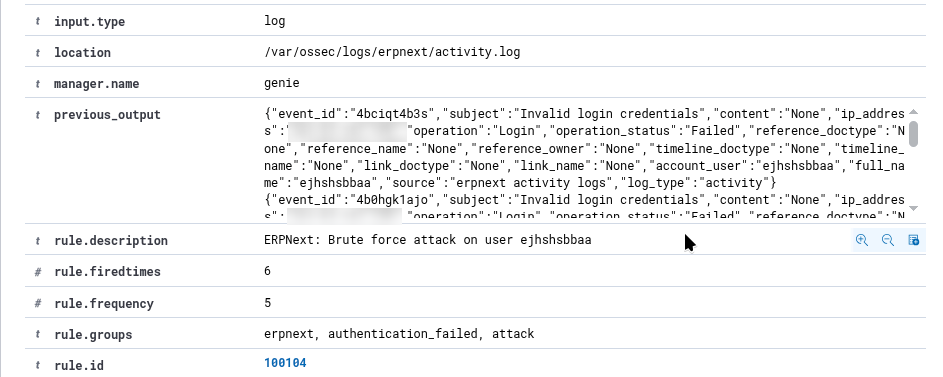
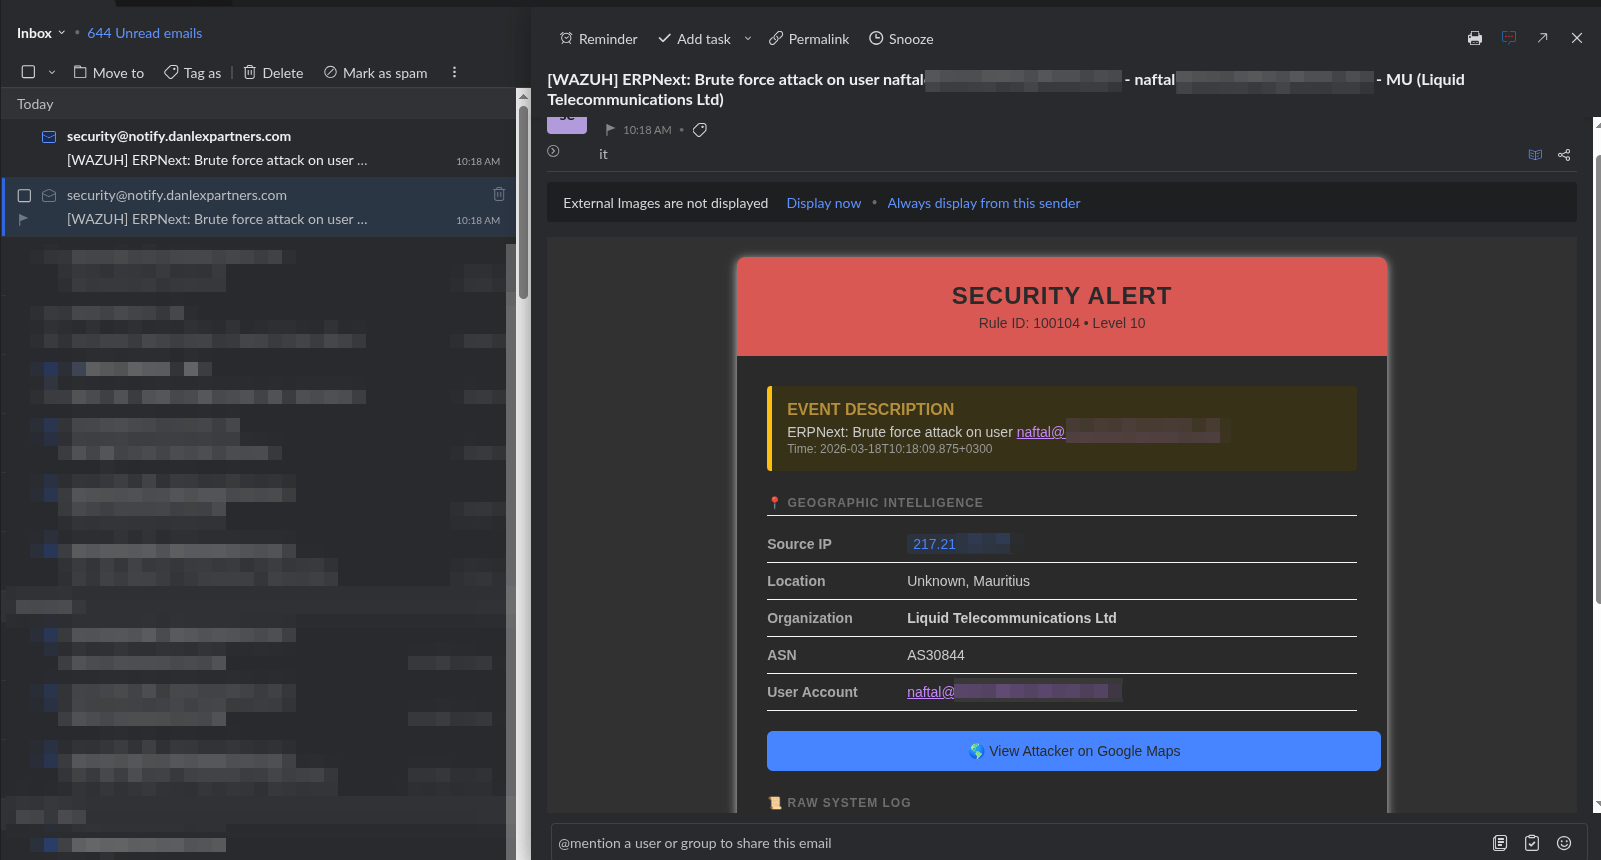
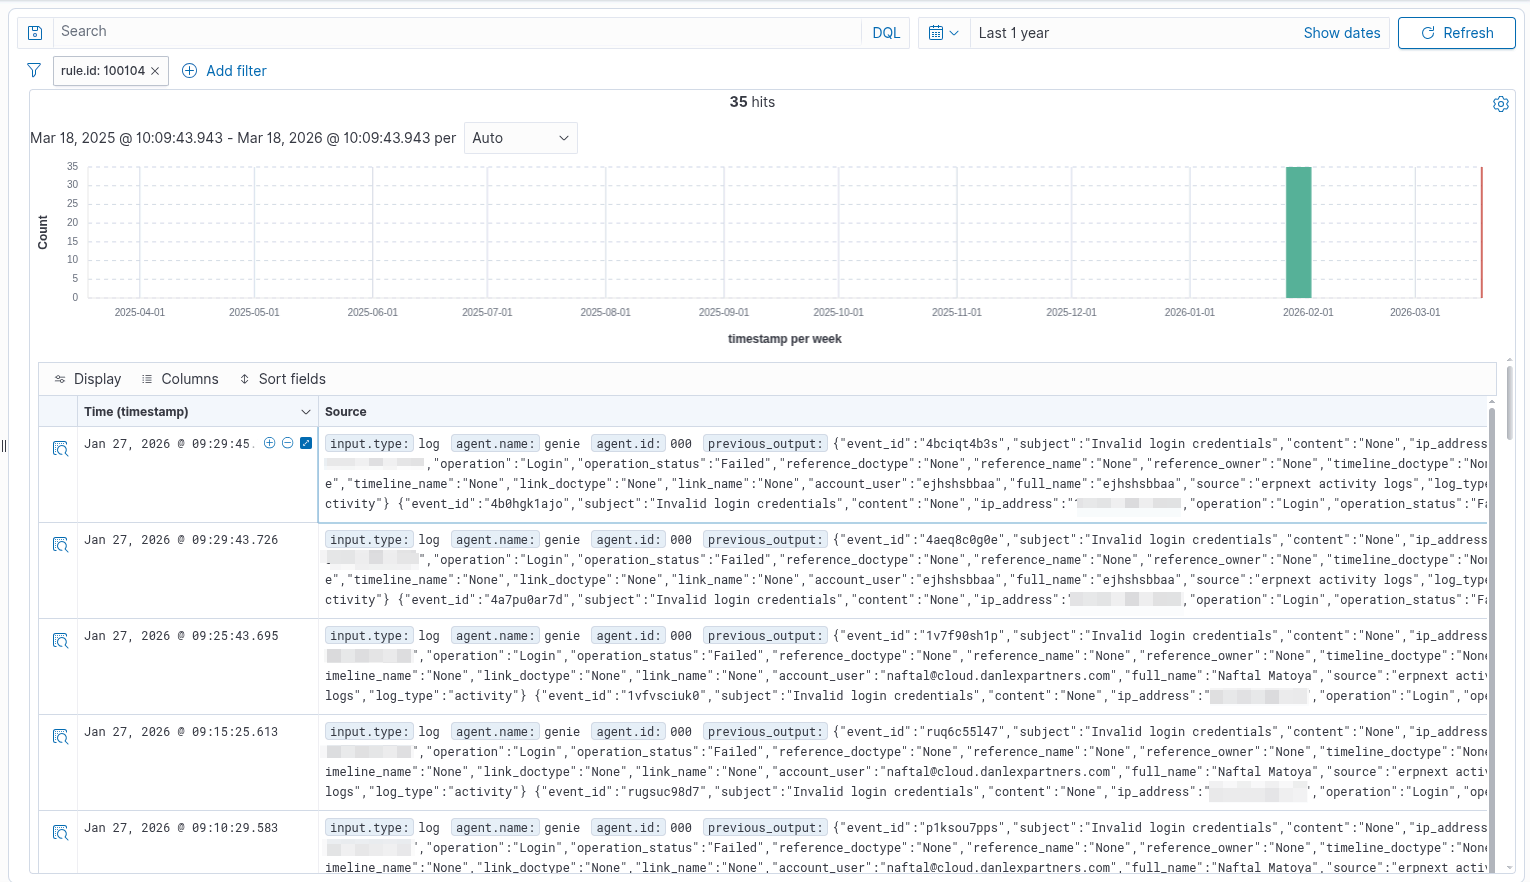
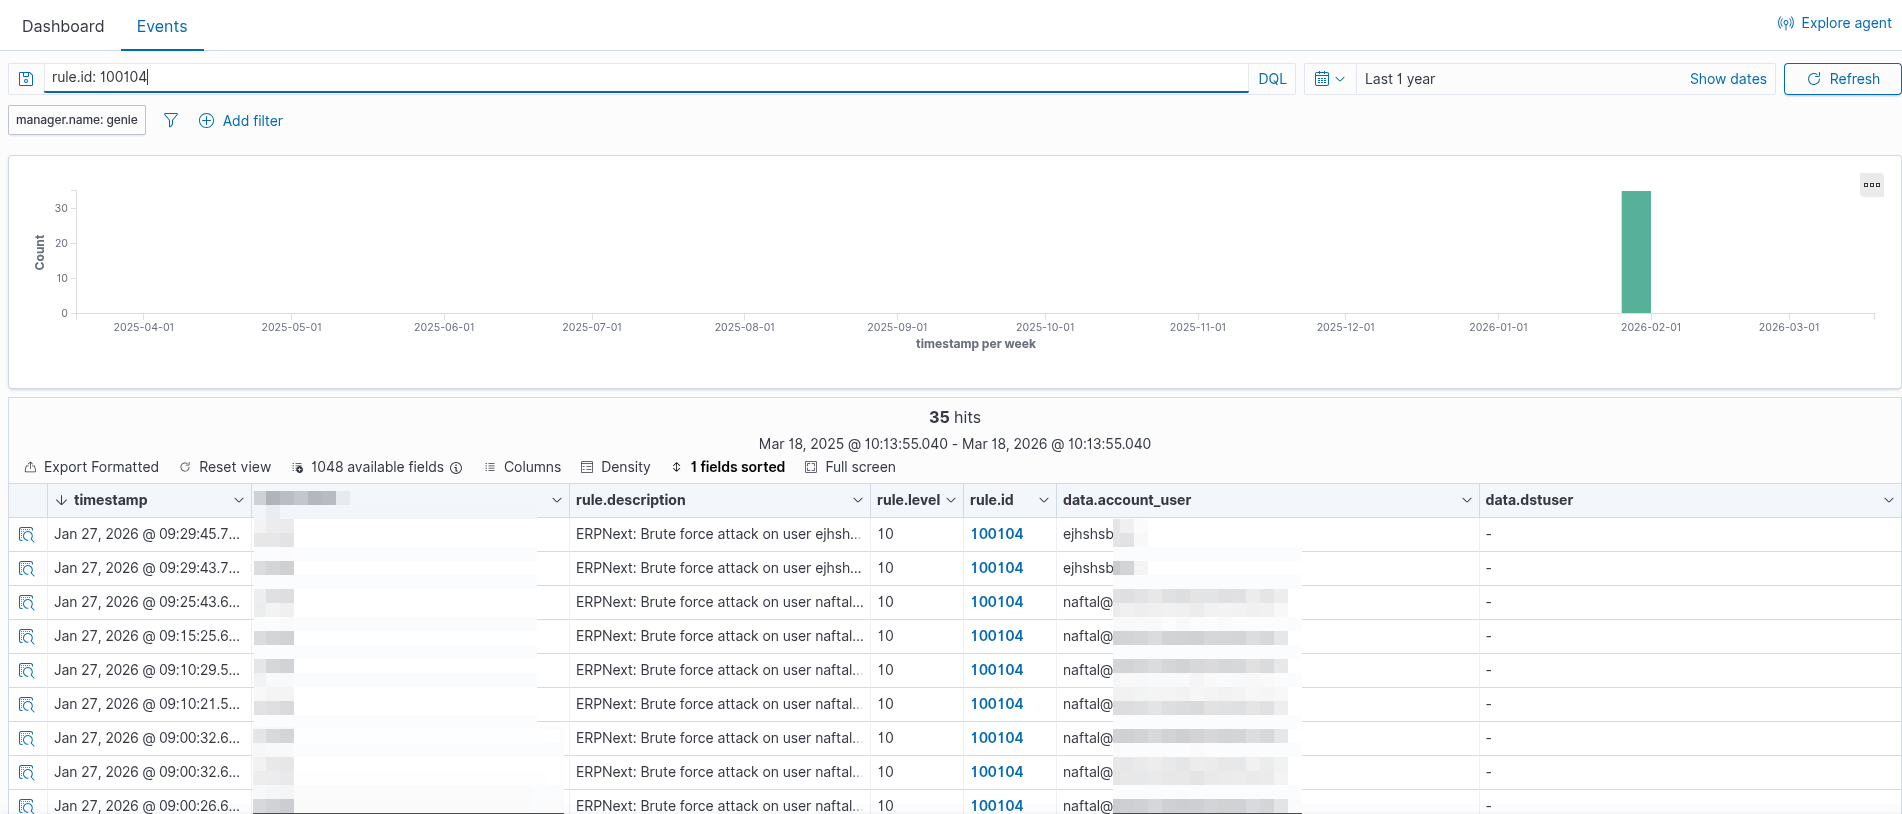
Verify in Wazuh Dashboard
Open the Wazuh dashboard and navigate to Security events. Filter by rule ID 100104 or 100105. You should see your test brute force attacks listed with all the details.
Summary
What started as "I should probably monitor my ERPNext logs" turned into a full SIEM integration. Here's what we built:
- Webhook receiver that bridges ERPNext and Wazuh
- Custom rules that detect brute force attacks by user and by IP
- Email alerts that notify us when attacks are detected
- Full audit trail visible in the Wazuh dashboard
The system now watches every login attempt, every document change, every permission modification. When someone tries to guess a password, I know within seconds.
There's more that could be added—geographic anomaly detection, after-hours alerts, automated IP blocking—but the foundation is solid. The data is flowing, the rules are working, and the alerts are sending.
Now I can actually trust that if something suspicious happens in ERPNext, I'll know about it.